Weather
monoDrive Dynamic Weather
The monoDrive Simulator supports dynamic weather conditions that change the visual and physical effects of the simulation. Pre-made weather profiles are available in all of the monoDrive client versions which can be sent to the simulator to configure the current weather conditions. Additionally, the monoDrive Scenario Editor provides an interactive way of changing weather conditions and saving them to configuration files.
Adding Weather to a Map
In the monoDrive Scenario Editor, the "Weather" actor can be found in any one of
the pre-made monoDrive Unreal Engine maps found in the Content/Maps directory.
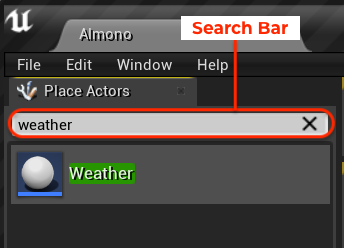
The Weather actor can be added to custom maps easily by searching for the Actor
in the "Place Actors" window as shown in the image below. Simply drag the actor into
the custom map and it should now appear in the "World Outliner".
The weather also references the wind actor and the fog actor. Simply add these two actors anywhere in the map the same as the weather actor.


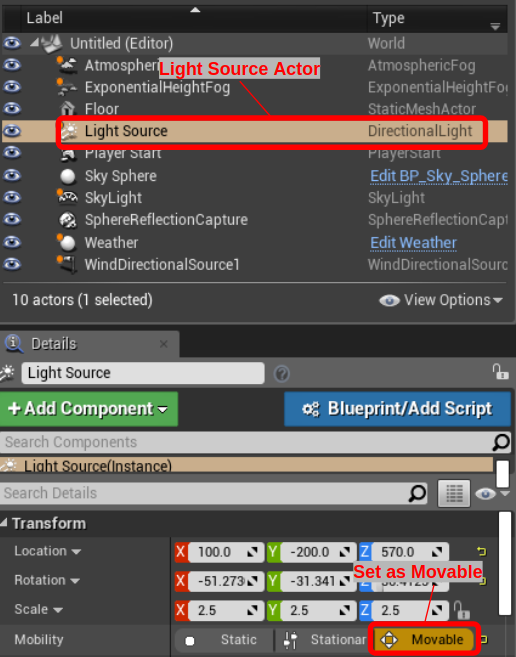
The final step to getting the weather functioning is to set the map's light source to movable. This will allow the weather to control the lighting. Find the "Light Source" in the "World Outliner" and in the "Details" window, set the "Mobility" to movable as shown in the image below:
Configuring Weather Profiles
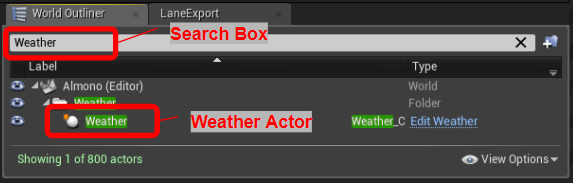
To find the Weather Actor in the map, first go to the "World Outliner" window and search for "weather" in the search box. The Weather Actor should appear as shown in the image below.
Clicking on the Weather Actor in "World Outliner" should bring up the "Details" window for the Actor. Scroll down to the "Weather Description" in the "Details" window to find the weather settings pictured below.

- Load File Button: Loads the current weather profile from the Profile Name in file specified in the "File Name" field.
- Save File Button: Saves the current weather profile to the file specified
in the "File Name" field. If the profile already existed in the file, it will be
updated with the current values. When saved, both this
.inifile and a.jsonfile will be saved for use with the simulator and client. - Configuration File Name: The name of the
.inifile to save the current profile to. - Profile Name: Located in the Name field under the Weather settings, specifies the human readable name of the weather profile to save to.
Importing Weather in CARLA Format
The monoDrive Weather can be easily imported from CARLA settings by putting
the desired profile into the
<VehicleAI Install Directory>\VehicleAI_Editor\Config\CarlaWeather.ini file.
This file is used to load the initial weather profiles into the simulator so
they can be edited in the weather settings. The contents of a profile in .ini
should look similar to the following:
[MyCoolNewProfile]
SunPolarAngle=44.586
SunAzimuthAngle=174
SunBrightness=0
SunDirectionalLightIntensity=20
SunDirectionalLightColor=(R=255.000000,G=255.000000,B=255.000000,A=1.000000)
SunIndirectLightIntensity=16.6
CloudOpacity=14.28
HorizontFalloff=20
ZenithColor=(R=0.034046,G=0.109247,B=0.295000,A=1.000000)
HorizonColor=(R=1.979559,G=2.586644,B=3.000000,A=1.000000)
CloudColor=(R=0.855778,G=0.919020,B=1.000000,A=1.000000)
OverallSkyColor=(R=1.000000,G=1.000000,B=1.000000,A=1.000000)
SkyLightIntensity=4
SkyLightColor=(R=247.000000,G=240.000000,B=225.000000,A=255.000000)
bPrecipitation=False
PrecipitationType=Rain
PrecipitationAmount=0
PrecipitationAccumulation=0
bWind=True
WindIntensity=10
WindAngle=0
bOverrideCameraPostProcessParameters=True
CameraPostProcessParameters.AutoExposureMethod=Histogram
CameraPostProcessParameters.AutoExposureMinBrightness=0.27
CameraPostProcessParameters.AutoExposureMaxBrightness=5
CameraPostProcessParameters.AutoExposureBias=-3.5
Saving Weather Profiles
The default configuration file for the simulator is CarlaWeather.ini and comes
with the shipped simulator. This file loads up several pre-determined weather
profiles for editing in the Scenario Editor. These profiles can be edited in
the Scenario Editor and saved out to a .json format that is usable in the
monoDrive clients.
After pressing the "Save File Button" pictured above, two files can be found
in the Config directory with the names specified in the
"Configuration File Name" field. In the .ini file, the saved profile can
be found under the specified "Profile Name" and appear as below:
In the .json file, the weather profile can be found in the JSON group where
the id field matches the "Profile Name":
{
  "id": "ClearNoon",
  "SunPolarAngle": 44.586,
  "SunAzimuthAngle": 174,
  "SunBrightness": 50,
  "SunDirectionalLightIntensity": 15.092,
  "SunDirectionalLightColor": {
    "A": 1.0,
    "B": 194.0,
    "G": 239.0,
    "R": 255.0
  },
  "SunIndirectLightIntensity": 6,
  "ZenithColor": {
    "A": 1.0,
    "B": 0.295,
    "G": 0.109247,
    "R": 0.034046
  },
  "HorizonColor": {
    "A": 1.0,
    "B": 1.0,
    "G": 0.862215,
    "R": 0.659853
  },
  "HorizontFalloff": 3,
  "CloudColor": {
    "A": 1.0,
    "B": 1.0,
    "G": 0.919005,
    "R": 0.855778
  },
  "CloudOpacity": 16.296,
  "OverallSkyColor": {
    "A": 1.0,
    "B": 1.0,
    "G": 1.0,
    "R": 1.0
  },
  "SkyLightIntensity": 10,
  "SkyLightColor": {
    "A": 0.0,
    "B": 0.152151,
    "G": 0.193979,
    "R": 0.195
  },
  "bPrecipitation": false,
  "PrecipitationType": "Rain",
  "PrecipitationAmount": 0,
  "PrecipitationAccumulation": 0,
  "bWind": false,
  "WindIntensity": 20,
  "WindAngle": 0,
  "bOverrideCameraPostProcessParameters": true,
  "CameraPostProcessParameters": {
    "AutoExposureMethod": "Histogram",
    "AutoExposureMinBrightness": 0.27,
    "AutoExposureMaxBrightness": 5,
    "AutoExposureBias": -3.5
  }
}
Using Weather in the LabVIEW Client
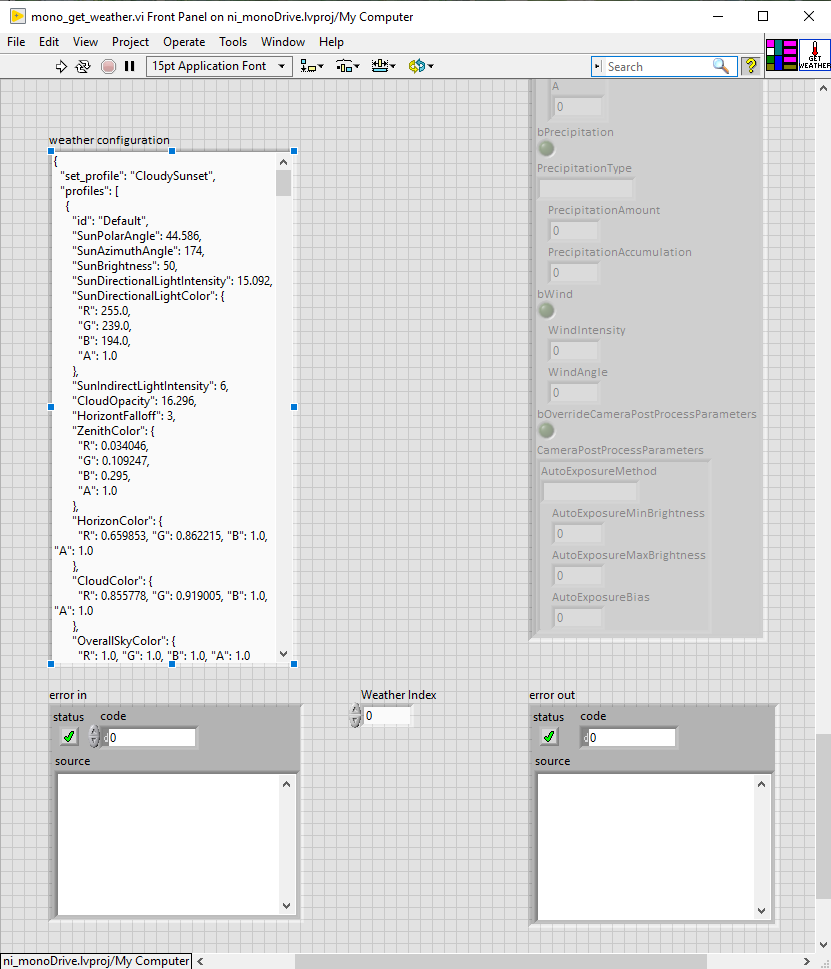
For the LabVIEW client, the weather profiles that are exported can be pasted into the weather configuration (string control) located in the mono_get_weather.vi.
After opening the VI's GUI: the weather profiles can be found on the right-hand side of the interface. Simply copy and paste your custom JSON weather profile:
Using the Weather in the Python Client
The monoDrive Python Client reads weather
settings from input JSON files and sends them to the simulator. In the following
example, simply place the desired weather configuration into the file
config/weather.json and construct the simulator:
 # Construct simulator from file
simulator = Simulator.from_file(
    config='./config/simulator_closed_loop.json',
    trajectory='./trajectories/Closed_Loop.json',
    sensors='./config/all_sensors.json',
    weather='./config/weather.json',
    ego='./config/vehicle.json',
)
Using the Weather in the C++ Client
The monoDrive C++ Client reads weather
settings from input JSON files and sends them to the simulator. In the following
example, simply place the desired weather configuration into the file
config/weather.json and construct the simulator:
//Read JSON files in cpp_client/config directory
Configuration config(
    "config/simulator.json",
    "config/vehicle.json",
    "config/weather.json",
    "config/scenario.json"
);
Simulator& sim = Simulator::getInstance(config, "127.0.0.1", 8999);