Weather
monoDrive Dynamic Weather
The monoDrive Simulator supports dynamic weather conditions that change the visual and physical effects of the simulation. Pre-made weather profiles are available in all of the monoDrive client versions which can be sent to the simulator to configure the current weather conditions. Additionally, the monoDrive Scenario Editor provides an interactive way of changing weather conditions and saving them to configuration files.
Adding Weather to a Map
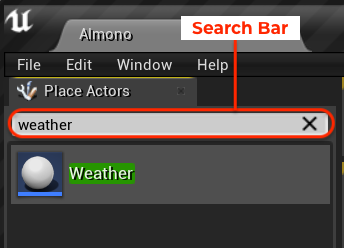
In the monoDrive Scenario Editor, the "Weather" actor can be found in any one of the pre-made monoDrive Unreal Engine maps. The Weather actor can be added to custom maps easily by searching for the Actor in the "Place Actors" window as shown in the image below. Simply drag the actor into the custom map and it should now appear in the "World Outliner".
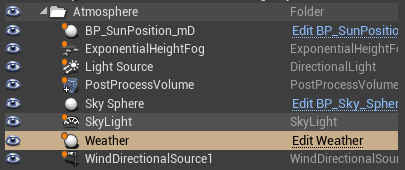
The weather actor requires several other weather related actors to function. Add the following addiitonal actors to the map:
Configuring Weather Profiles
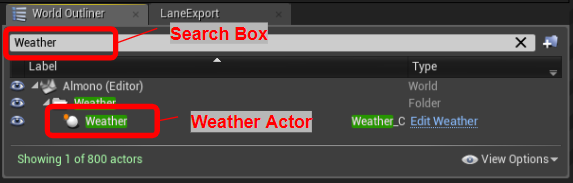
To find the Weather Actor in the map, first go to the "World Outliner" window and search for "weather" in the search box. The Weather Actor should appear as shown in the image below.
Clicking on the Weather Actor in "World Outliner" should bring up the "Details" window for the Actor. Scroll down to the "Weather Description" in the "Details" window to find the weather settings pictured below.
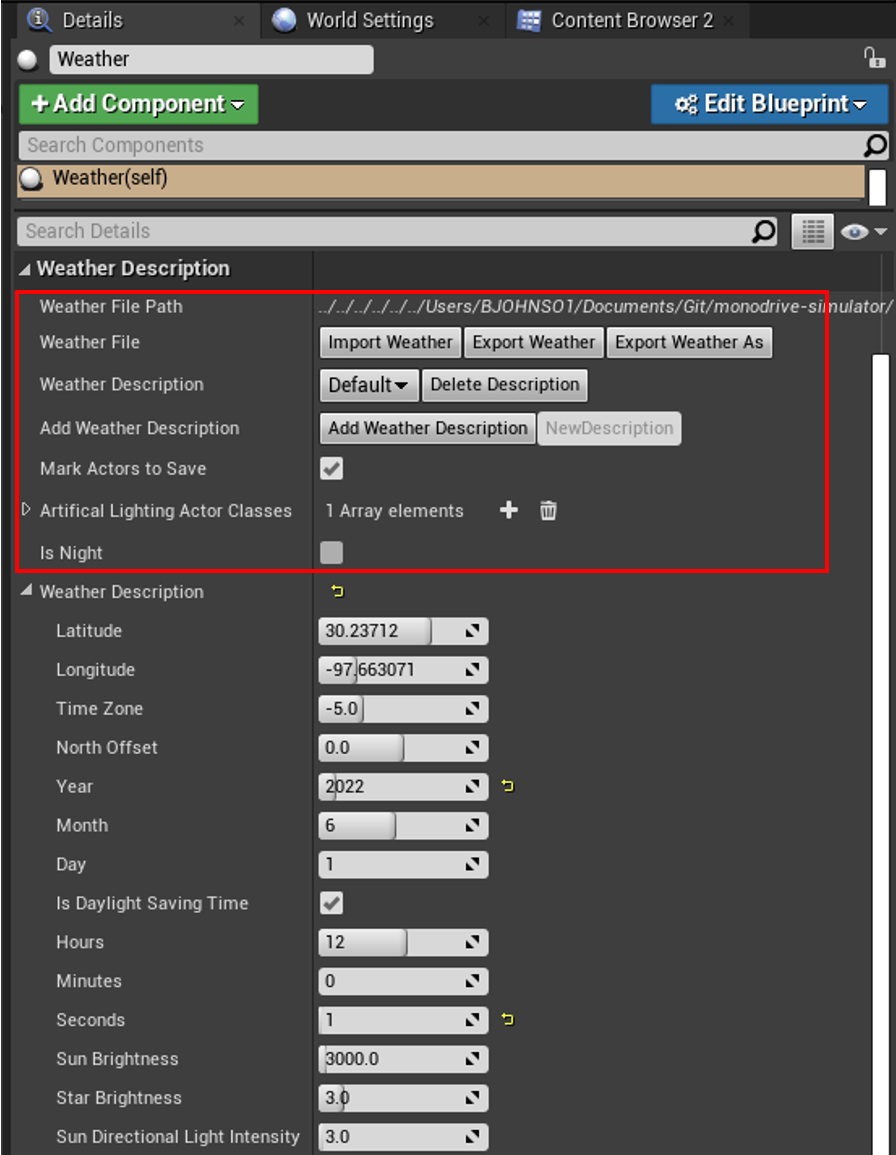
Import Weather Button: Opens a file dialog to import a weather .json file. This will populate the Weather Description list with the new descriptions while removing the currently loaded descriptions.
Export Weather Button: Saves the weather description list to the .json file listed. This enables the use of the weather descriptions from the client. If no file path is listed in Weather File Path then a file dialogue will popup requesting the user to select or created the file.
Export Weather As Button: Opens a file dialogue to select or create a new weather .json file for export.
Mark Actors to Save: The weather actor works by modifying the other actors responsible for producing weather affects such as the fog actor, directional light component, sky light etc. When this box is selected, modifying the current weather description or changing the selected weather description will mark the affected actors as dirty. This will enable the user to save the level the actor belongs to so that whenever the map is loaded, weather will be set just as it is seen right now.
Artificial Lighting Actor Classes: If a user hase added custom actors to the map which have lights which can be enabled or disabled, the actor class for these actors can be added to this list. These actors will receive the notification that the map is now in night settings so that they will enable/disable automatically.
Is Night: This is view only and indicates whether the map is considered to be in night. The logic that sets this is viewable in the Weather blueprint.
Weather parameters
The sun position can be controlled using geopositioning and time or directly. This sections uses geopositioning.
Sun Direction and Intensity, geopositioned
Latitude: The latitude at origin of map, ranges from -89.99 (south) to 89.99 (north), used to position the sun.
Longitude: The longitude at origin of map, ranges from -180 (west) to 180 (east), used to position the sun.
TimeZone: The UTC time zone ranging from -12 to +14.
NorthOffset: The relative orientation of the map with respect to the X axis which is default north.
Year: Year of the simulation.
Month: Month of the simulation, will affect the beta angle or how high the sun will appear in the sky in a given day cycle based on lat/long and time zone.
Day: Day of the simulation.
IsDaylightSavingTime: Some areas use daylight saving time which will offset time by 1 hour.
Hours: Hour of the simulation.
Minutes: Minute of the simulation.
Seconds: Seconds of the simulation.
SunBrightness: Brightness of the sun in the sky, does not change light output.
StarBrightness: Brightness of the stars in the sky, does not change light output. Note, sun heigh must be low before stars become visible.
SunDirectionalLightIntensity: Light intensity projected by the sun in the direction from the sun's position.
SunDirectionalLightColor: Color of the light projected by the sun.
Sun Direction Override, to directly control sunposition use the following override and settings.
bOverideTimeBasedSunAngle: Uses the Sun polar and azimuth angles instead of the accurate date time based sun position.
SunPolarAngle: Polar angle of the Sun in degrees, with 0.0 at zenith, 90.0 at equator. Sets the position of the sun in the sky around the Y axis.
SunAzimuthAngle: Azimuth angle of the Sun in degrees. Sets the position of the sun in the sky around the Z axis.
Sky
Note: These will likely be updated in the following release with the new volumetric cloud system and sky atmosphere.
CloudOpacity: Sets how visible the clouds are, at higher values the clouds become emissive.
CloudColor: Color of the clouds in the sky.
CloudSpeed: The speed at which the clouds move across the sky.
HorizonFalloff: Controls the gradient falloff between the horizon and zenith parts of the sky.
ZenithColor: Color of the upper portion of the sky.
HorizonColor: Color of the lower portion of the sky.
OverallSkyColor: Overall color of the sky blended with horizon and zenith.
SkyLightIntensity: Ambient lighting applied to the scene. This is used in addition to the directional light to add ambient lighting.
SkyLightColor: The color of the ambient light.
Fog
FogDensity: How dense the fog is from 0.0 to 0.05
SecondFogDensity: A second layer fog density, improves depth, from 0.0 to 0.05
FogHeightFalloff: Height at which the fog stops, from 0.0 to 2.0
SecondFogHeightFalloff: Height at which the second fog stops, from 0.0 to 2.0
SecondFogHeightOffset: Increasing drastically drops off the visibility. 0.0 to inf
FogInscatteringColor: Fog color. RGBA (0.0->1.0)
FogMaxOpacity: How clear the fog is. 0.0 to 1.0
FogStartDistance: Distance from viewer that the fog starts. 0.0 to 5000.0
FogCutoffDistance: Distance from the viewer that the fog stops. 0.0 to 20000000.0
Precipitation Effects
bPrecipitation: Weather to include rain or wetness on master road material.
PrecipitationType: Type of precipitation; only Rain is currently supported.
PrecipitationAmount: Amount of precipitation to display in the the particle effect. Also effects sensors like lidar which will have more attenuation. 0.0 to 100.0
PrecipitationAccumulation: Amount of precipitation to accumulate on the ground. Visible in amount of water on ground. 0.0 to 100.0
Wind Effects
bWind: Whether to include wind affects such as swaying of trees and foliage.
WindIntensity: How intense the wind affect is from 0.0 to 100.0.
WindAngle: Direction with respect to X axis in the map for the wind.
Exporting Weather Descriptions
After exporting the weather descriptions a json file will be generated with name parity to the description seen in the editor. It is structured as descriptions which points to a list of descriptions. id refers to the name which will be visible in the Weather Description drop down.
{
 "descriptions": [
  {
   "CloudColor": {
    "A": 1.0,
    "B": 1.0,
    "G": 0.9190000295639038,
    "R": 0.8557999730110168
   },
   "CloudOpacity": 1.1399999856948853,
   "Day": 1,
   "FogCutoffDistance": 0.0,
   "FogDensity": 0.0,
   "FogHeightFalloff": 0.20000000298023224,
   "FogInscatteringColor": {
    "A": 1.0,
    "B": 1.0,
    "G": 0.6380000114440918,
    "R": 0.4449999928474426
   },
   "FogMaxOpacity": 1.0,
   "FogStartDistance": 0.0,
   "HorizonColor": {
    "A": 1.0,
    "B": 1.0,
    "G": 0.8622000217437744,
    "R": 0.6599000096321106
   },
   "HorizonFalloff": 10.0,
   "Hours": 12,
   "IsDaylightSavingTime": true,
   "Latitude": 30.237119674682617,
   "Longitude": -97.66307067871094,
   "Minutes": 0,
   "Month": 6,
   "NorthOffset": 0.0,
   "OverallSkyColor": {
    "A": 1.0,
    "B": 1.0,
    "G": 1.0,
    "R": 1.0
   },
   "OverideTimeBasedSunAngle": false,
   "PrecipitationAccumulation": 0.0,
   "PrecipitationAmount": 0.0,
   "PrecipitationType": "Rain",
   "SecondFogDensity": 0.0,
   "SecondFogHeightFalloff": 0.20000000298023224,
   "SecondFogHeightOffset": 0.0,
   "Seconds": 0,
   "SkyLightColor": {
    "A": 0.0,
    "B": 0.1412999927997589,
    "G": 0.1851000040769577,
    "R": 0.19499999284744263
   },
   "SkyLightIntensity": 1.0,
   "StarBrightness": 3.0,
   "SunAzimuthAngle": 45.0,
   "SunBrightness": 3000.0,
   "SunDirectionalLightColor": {
    "A": 1.0,
    "B": 194.0,
    "G": 239.0,
    "R": 255.0
   },
   "SunDirectionalLightIntensity": 3.0,
   "SunPolarAngle": 45.0,
   "TimeZone": -5.0,
   "WindAngle": 0.0,
   "WindIntensity": 20.0,
   "Year": 2022,
   "ZenithColor": {
    "A": 1.0,
    "B": 0.29499998688697815,
    "G": 0.10920000076293945,
    "R": 0.03400000184774399
   },
   "bPrecipitation": false,
   "bWind": false,
   "id": "Default"
  }
 ]
}
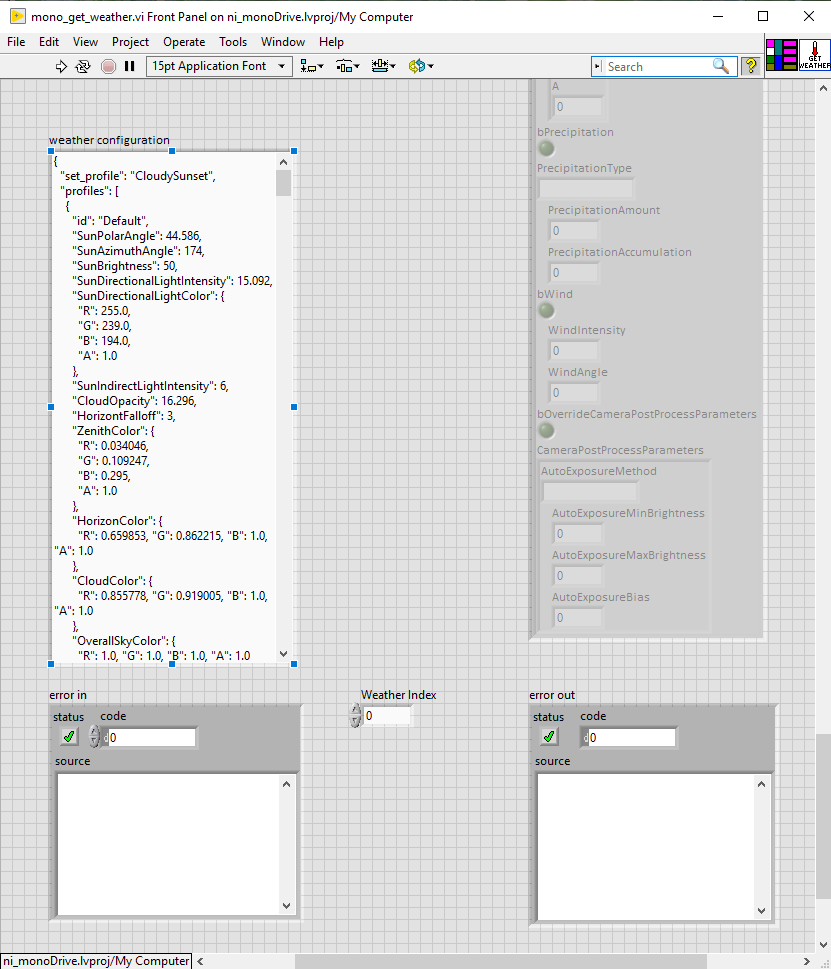
Using Weather in the LabVIEW Client
For the LabVIEW client, the weather profiles that are exported can be pasted into the weather configuration (string control) located in the mono_get_weather.vi.
After opening the VI's GUI: the weather descriptions can be found on the right-hand side of the interface. Simply copy and paste the custom JSON weather profile:
Using the Weather in the Python Client
The monoDrive Python Client reads weather
settings from input JSON files and sends them to the simulator. In the following
example, simply place the desired weather configuration into the file
config/weather.json and construct the simulator:
 # Construct simulator from file
simulator = Simulator.from_file(
    config='./config/simulator_closed_loop.json',
    trajectory='./trajectories/Closed_Loop.json',
    sensors='./config/all_sensors.json',
    weather='./config/weather.json',
    ego='./config/vehicle.json',
)
Using the Weather in the C++ Client
The monoDrive C++ Client reads weather
settings from input JSON files and sends them to the simulator. In the following
example, simply place the desired weather configuration into the file
config/weather.json and construct the simulator:
//Read JSON files in cpp_client/config directory
Configuration config(
    "config/simulator.json",
    "config/vehicle.json",
    "config/weather.json",
    "config/scenario.json"
);
Simulator& sim = Simulator::getInstance(config, "127.0.0.1", 8999);