Scenario File Creation
The monoDrive Scenario Editor is a graphical user interface which enables users to create scenario files which can be sent from the client to spawn various actors during runtime. The scenario file is human readable JSON and the parameters therein can be permuted by your orchestration software of choice to generate thousands of scenarios.
Additionally, all actors spawned by the ScenarioConfig client call can be further manipulated during runtime. Generic actors are manipulated using UpdateState, and vehicles are manipulated through one of several vehicle commands depending on whether the vehicle is the ego or not: VehicleControlConfig, EgoControl, or EgoTorqueControl.
"vehicles" stores the AI vehicles which will be part of your scenario as well as their behavioral parameters.
"trigger_boxes" can be either placed in the scene or attached to vehicles to trigger a behavior in a vehicle when the vehicle overlaps these invisible areas.
"tagged_actors" stores all of the non-vehicle actors which will be part of your scenario such as static-mesh and skeletal-mesh actors.
"instance_components" are nested actors or components attached to other actors or vehicles in the scenario. For example, you could put things in the back of a truck bed or a human driver graphical model in a a vehicle.
"tagged_components" are those components in an actor which a user would like to modify the materials of as part of the scenario. You can change the physical properties by loading a different material or something as simple as the color.
Placing monoDrive Vehicles in a Scene
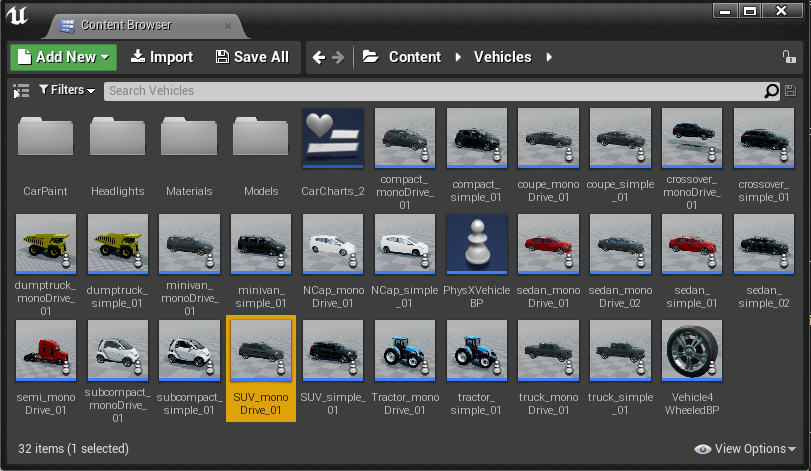
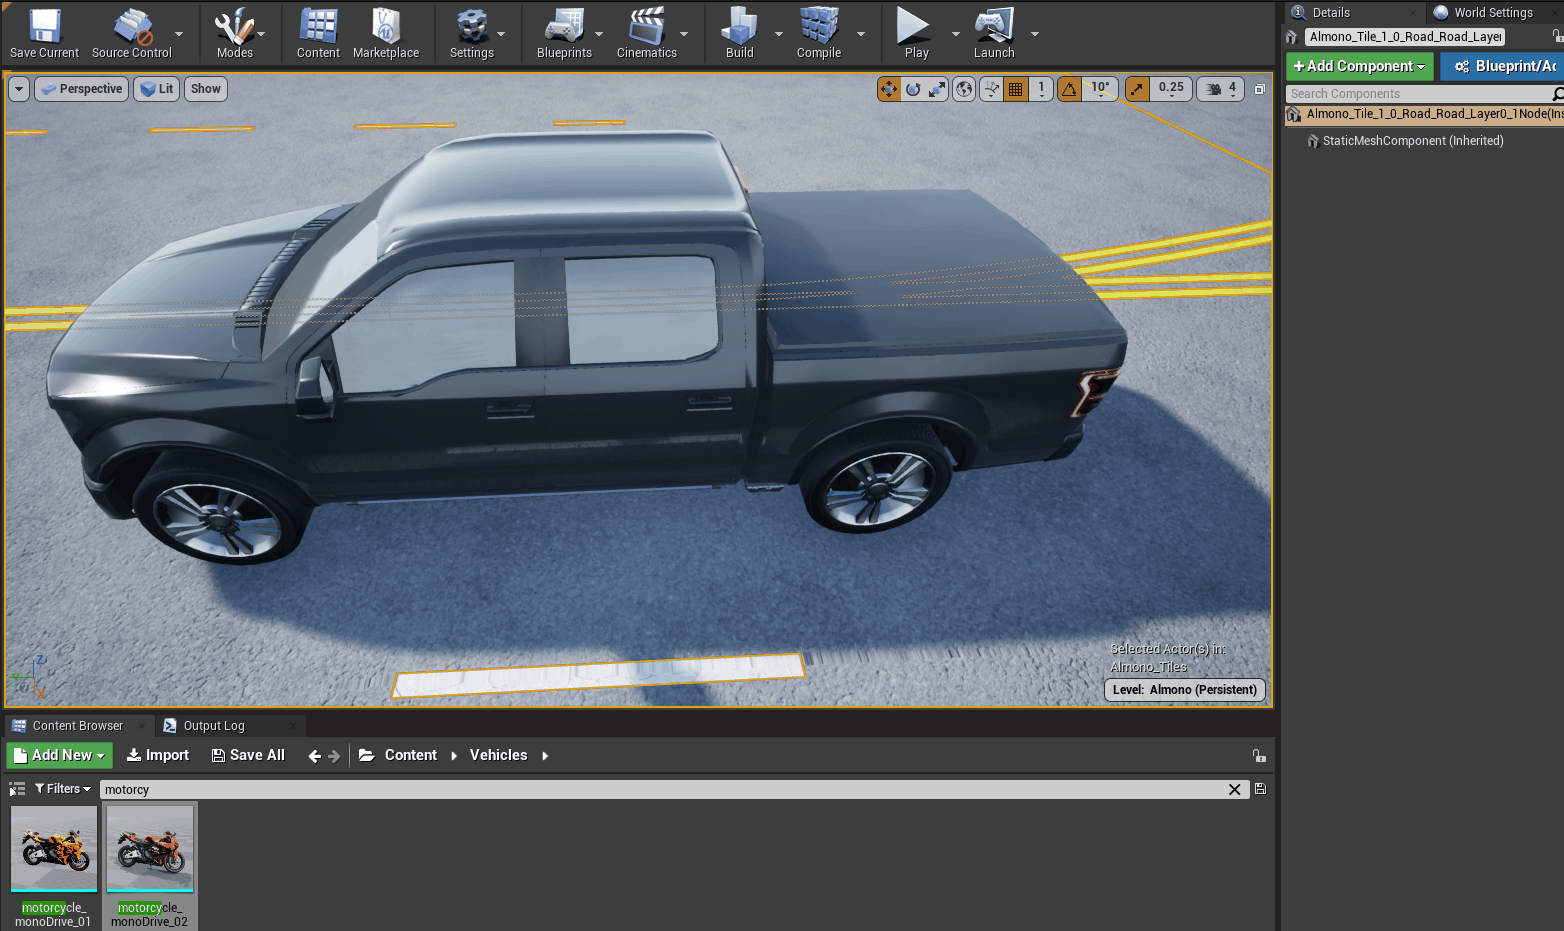
The first step in creating a scenario is setting up the monoDrive vehicles in the desired scene and applying driving properties to each. To place a vehicle:
-
In the "Content Browser" navigate to the folder
Content/Vehicles
-
Drag one of the vehicles into the scene by click on the vehicle's icon and putting it on the desired lane of travel.
-
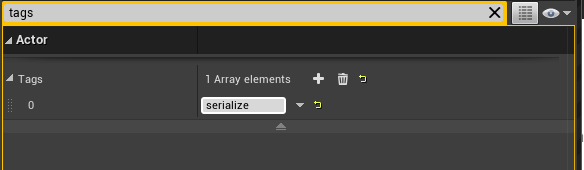
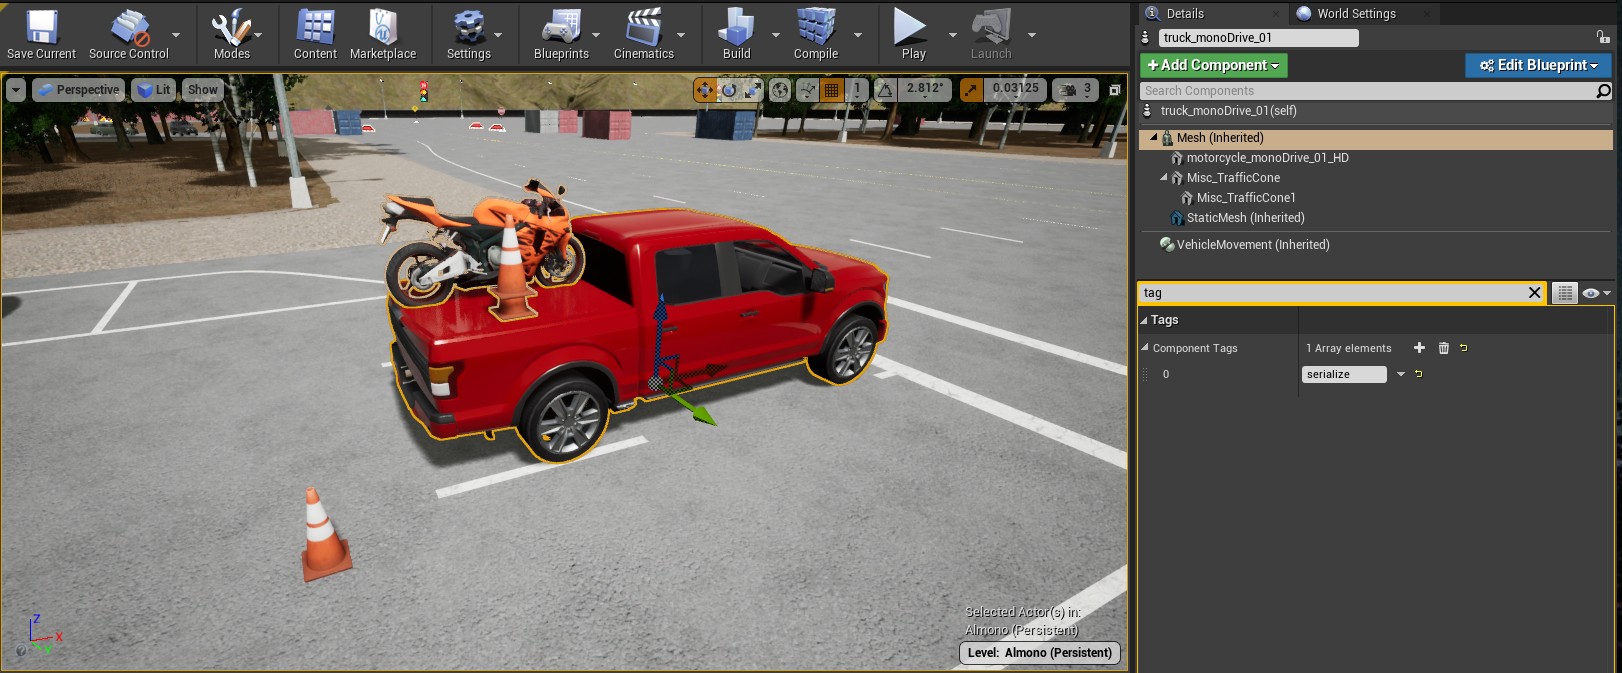
When adding actors that aren't provided by monoDrive to a scenario, make sure to add "serialize" under the Actor's "Tags".
-
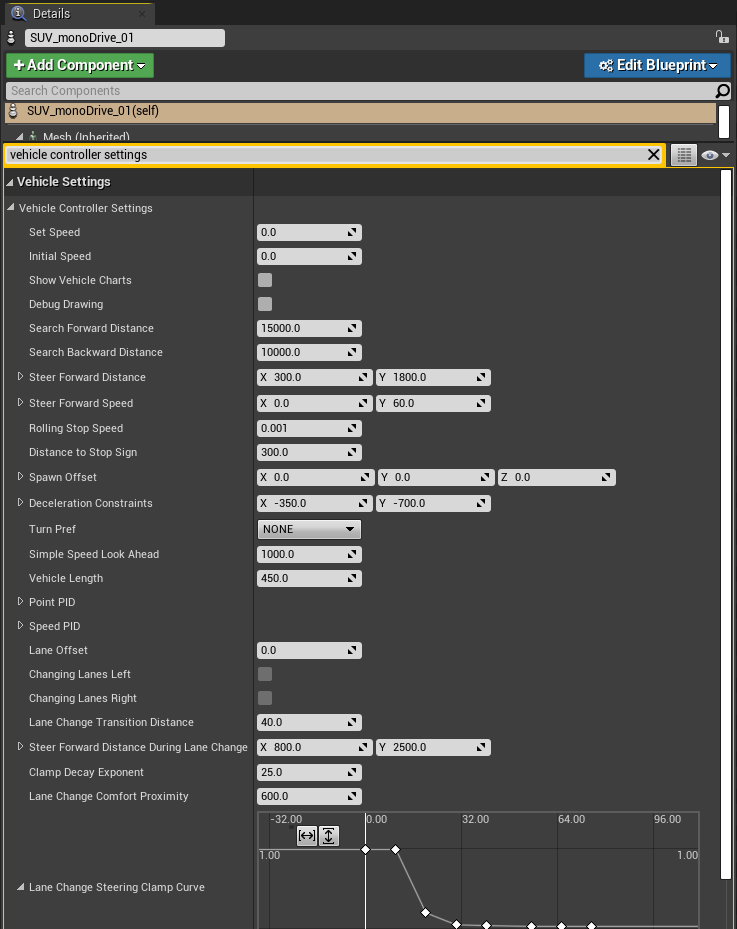
In the "Details" window, search for the "Vehicle Controller Settings" group and and set the desired vehicle controller settings.
-
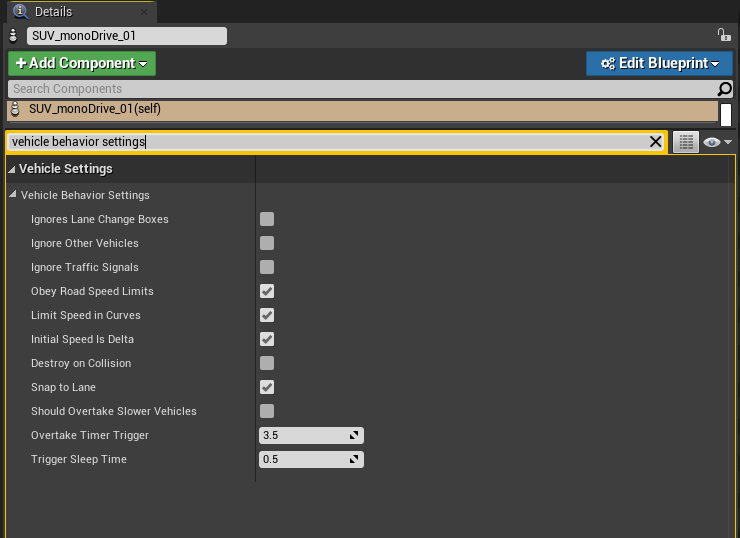
In the "Details" window, search for the "Vehicle Behavior Settings" group and set the desired vehicle behaviors for traffic laws.
-
At the top of the Scenario Editor hit the "Play" button. The vehicle should begin to travel down the lane closest to its original placement.
-
Repeat this with multiple vehicles until the scene is populated as desired.
Detailed Vehicle Behavior Settings
The "Vehicle Settings" section of a vehicle's details contains two types of behavior settings: vehicle controller settings and vehicle behavior settings.
Vehicle Controller Settings
The first section, "Vehicle Controller Settings", contains several settings relative to vehicle behavior for speed and control:
-
Set Speed: Sets the desired speed of the vehicle as a delta above or below the road's speed limit in miles per hour. For example, if the road's set speed limit is 40mph, a value of "0" would result in the vehicle moving at a speed of 40mph, and with a value of "-20", the vehicle's speed would be 20mph. When the "Obey Road Speed Limits" is not set, the input in this field sets the speed of the vehicle (in miles per hour) without regarding the road's speed limit.
-
Initial Speed: Sets the initial speed of the vehicle as a delta above or below the road's speed limit in miles per hour. When the "Obey Road Speed Limits" is not set, the input in this field sets the speed of the vehicle (in miles per hour) without regarding the road's speed limit.
-
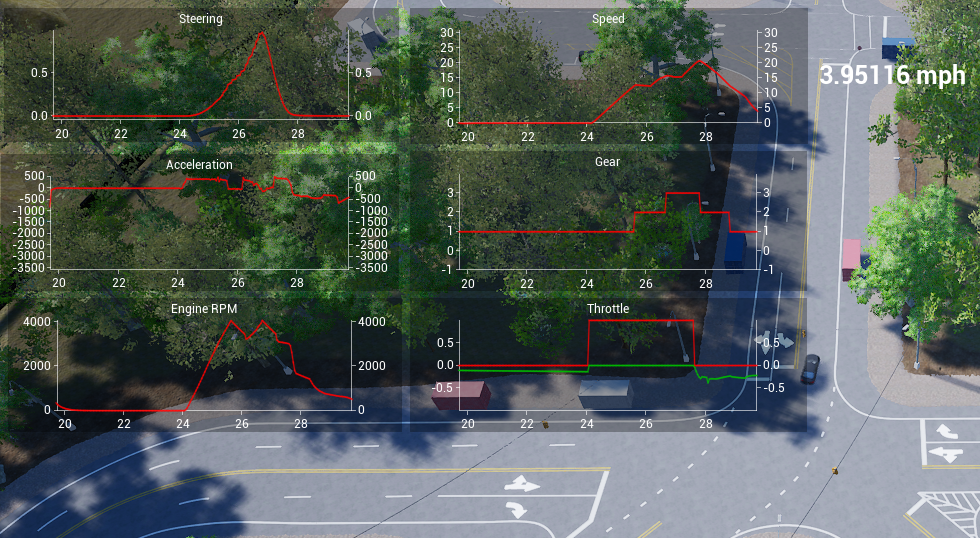
Show Vehicle Charts: If set, then vehicle dynamics charts will be shown. Charts display information about Steering, Speed, Acceleration, Gear, Engine RPM, and Throttle. To the right of the charts, the speed of the vehicle is displayed in miles per hour.
-
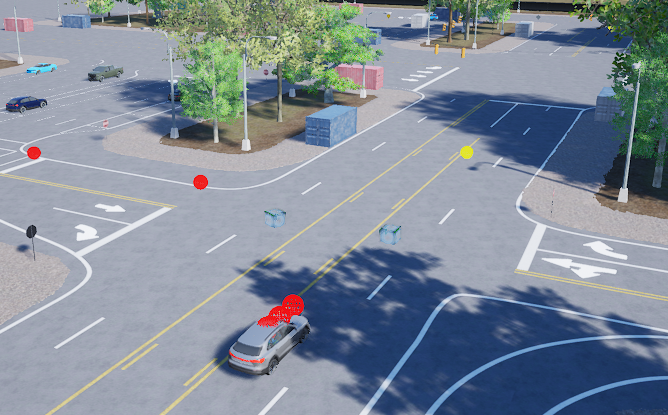
Debug Drawing: If set, then debug vehicle information will be drawn in the editor. The blue point indicates the steer forward position, the red points indicate the path points, and the cyan point is the predicted distance given the change in speed control.
-
Search Forward Distance: The number of centimeters to look ahead when computing AI actions. If speeds are much higher than 70mph consider increasing.
-
Search Backward Distance: The number of centimeters to look backward when computing AI actions.
-
Steer Forward Distance: The range of centimeters to look ahead when performing steering AI actions, interpolated based on
steerForwardSpeedRange. -
Steer Forward Speed: The range of speed (mph) used to LERP
steerForwardDistance. -
Rolling stop speed: The speed to travel before continuing after a legal stop.
-
Distance to Stop Sign: The number of centimeters to stop before a controlled intersection.
-
Spawn Offset: The offset to apply to the vehicle position prior to spawning.
-
Deceleration Constraints: The minimum and maximum deceleration of the vehicle used by AutoPilot. cm/s^2.
-
Turn Pref: (Turn Preference) At the next turn the vehicle will prefer to take this turn. This will reset the drop down menu to "NONE" after the following turn.
-
Simple Speed Look Ahead: The number of centimeters to look ahead when performing simple speed control.
-
Vehicle Length: Total length of the vehicle, used in various maneuver calculations.
-
Point PID: PID Controller settings for point control.
-
Speed PID: PID Controller settings for speed control.
-
Lane Offset: The number of centimeters to drive from the lane center: positive is right, negative is left.
-
Changing Lanes Left: / Changing Lanes Right: Status change only, shows when vehicle is in lane change.
-
Lane Change Transition Distance: Lane Change is considered complete after the origin vehicle coordinate frame is this many centimeters from the new lane center.
-
Steer Forward Distance During Lane Change: The range in centimeters to look ahead when performing steering AI actions during a lane change, interpolated based on steerForwardSpeedRange.
-
Clamp Decay Exponent: Exponential decay to lighten the clamping to full steering extents as the vehicle converges on the center lane to regain steering control.
-
Lane Change Comfort Proximity: The minimum proximity in centimeters behind and in front of the vehicle for which it is acceptable to change lanes. In addition, the vehicle calculates if it or the other vehicle could stop in time to avoid the collision, and this value sets an extra barrier.
-
Lane Change Steering Clamp Curve: Sets a threshold as a function of speed for the steering control. At the start of lane transition, this value will be used, but as the vehicle converges the clamp decay function will take over until full steering control is returned. Lower values smooth the lane change, higher values create a more aggressive lane change.
Vehicle Behavior Settings
The "Vehicle Behavior Settings" section of a vehicle's settings contains options for obeying (or not) traffic laws:
-
Ignores Lane Change Boxes: If set, all lane change trigger boxes will be ignored.
-
Ignore Other Vehicles: If set, all other vehicles will be ignored when computing AI actions.
-
Ignore Traffic Signals: If set, this vehicle will ignore all traffic control devices.
-
Obey Road Speed Limits: If set, this vehicle will obey the speed limits of the road and set speed and initial speed will be a delta above or below the road's speed limit.
-
Limit Speed in Curves: If set, this vehicle will attempt to slow down in order to properly corner in turns.
-
Initial Speed is Delta: If set, when vehicle is obeying road speed limits, the initial velocity will be used as a delta above or below the speed limit. If vehicle is not obeying road speed limits this setting is ignored.
-
Destroy on Collision: If set, this vehicle will be removed in the scene after colliding with another physics body.
-
Should Overtake Slower Vehicles: If set, will allow vehicle to overtake slower vehicles that it is following for the overtake timer trigger set amount of time. Otherwise, the vehicles will slow to the lead vehicle's speed and remain there.
-
Overtake Timer Trigger: The time in seconds a vehicle should wait before triggering the "Should Overtake Slower Vehicles" behavior when it is following a vehicle. Only applies when the vehicle is allowed to overtake vehicles.
-
Snap to Lane: If set, this vehicle will search for the nearest lane and snap to it at spawn.
-
Trigger Sleep Time: A vehicle might hit a dynamic trigger box more than once as they are in motion, to avoid double triggering, behavior can only be modified by the same trigger component again after this many seconds.
Replay Vehicle Path
The user may specify the vehicle's blueprint path for replay. This path needs to point to a vehicle derived from Custom Physics Vehicle, which can be a shell with no physics implemented for this purpose.
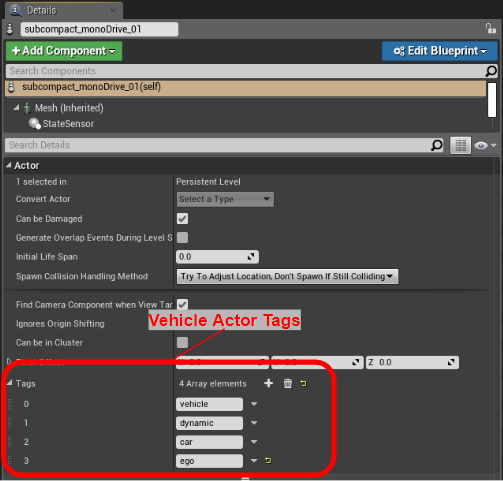
Tagging System
The Simulator's tagging system is used to specify attributes for desired actors in a recording or to indicate to the scenario system that an otherwise generic actor is part of a scenario. The tags for each actor can be seen by clicking on the actor and scrolling down to the actor's "Actor" group and looking under the "Tags" array.
Placing Custom Actors and Blueprints in a Scenario
Any actor can be added as part of a scenario by adding the "serialize" tag to the actors tag list. See the Tagging System section. Blueprints, Static-Mesh actors, Skeletal-Mesh actors, and Pedestrians are currently supported. A actor that would normally be part of only the level is now serialized to the json file that defines the scenario.
For example, this "Misc_TrafficCone" actor will now show up in the "tagged_actors" list of the scenario file.
{
  "tagged_actors": [
    {
      "blueprint_parameters": [],
      "class_path": "/Game/Meshes/RoadArt/Organize/StreetSet/Misc_TrafficCone.Misc_TrafficCone",
      "instance_components": [],
      "location": {
        "x": 11713.0,
        "y": -835.0,
        "z": 12.0
      },
      "name": "Misc_TrafficCone_2",
      "rotation": {
        "pitch": 0.0,
        "roll": 0.0,
        "yaw": 0.0
      },
      "scale": {
        "x": 1.0,
        "y": 1.0,
        "z": 1.0
      },
      "tagged_components": [],
      "tags": [
        "serialize"
      ],
      "type": "StaticMeshActor"
    }
  ]
}
Blueprint parameters
"blueprint_parameters"
In addition to custom actors, blueprint parameters are also automatically discovered and added to scenario files. These parameters will show up under the "blueprint_parameters" key for the given actor. Supported parameter types are are Int32, Float, and Boolean.
For example, this lightpost has a boolean blueprint parameter of "LightsOn" which turns the light on or off. This parameter will be auto-discovered now that the actor is marked as part of the parameter and this value can then be changed in the json at run time to modify the scenario.

{
  "tagged_actors": [
    {
      "blueprint_parameters": [
        {
          "max": true,
          "min": false,
          "name": "LightsOn",
          "type": "bool",
          "value": true
        }
      ],
      "class_path": "/Game/Blueprints/prp_streetLight_Blueprint.prp_streetLight_Blueprint_C",
      "instance_components": [],
      "location": {
        "x": 11804.0,
        "y": -2623.0,
        "z": 0.0
      },
      "name": "prp_streetLight146",
      "rotation": {
        "pitch": 0.0,
        "roll": 0.0,
        "yaw": -176.0474853515625
      },
      "scale": {
        "x": 1.0,
        "y": 1.0,
        "z": 1.0
      },
      "tagged_components": [],
      "tags": [
        "street_light",
        "static",
        "serialize"
      ],
      "type": "Actor"
    }
  ]
}
Attached components, Adding Static or Skeletal Meshes to an Actor
"instance_components"
Components added to actors or blueprints can be added and saved as part of the scenario as well. This allows you to attach arbitrary objects to scenario actors. For example, you can place tools in a truck bed or a human driver in a vehicle. These components show up under "instance_components" and they are automatically discovered by the monoDrive scenario engine. The location in the hierarchy of the actor's components will be preserved. There is no need to tag these added components, they will be auto-discovered.
{
  "vehicles": [
    {
      "class_path": "/Game/Vehicles/truck_monoDrive_01.truck_monoDrive_01_C",
      "controller_settings": { "..." },
      "instance_components": [
        {
          "class_path": "/Game/Vehicles/Models/motorcycle_monoDrive_01/motorcycle_monoDrive_01_HD.motorcycle_monoDrive_01_HD",
          "location": {
            "x": -196.0,
            "y": 0.0,
            "z": 133.0
          },
          "name": "motorcycle_monoDrive_01_HD",
          "parent_name": "VehicleMesh",
          "rotation": {
            "pitch": 0.0,
            "roll": 0.0,
            "yaw": 0.0
          },
          "scale": {
            "x": 1.0,
            "y": 1.0,
            "z": 1.0
          },
          "type": "StaticMeshComponent"
        }
      ]
    }
  ]
}
Note: Most normal vehicle parameters were removed for the sake of brevity.
These instance components can also be arbitrarily nested and their hierarchy is preserved. For example, see the stack of cones.
"instance_components": [
  {
    "class_path": "/Game/Meshes/RoadArt/Organize/StreetSet/Misc_TrafficCone.Misc_TrafficCone",
    "location": {
      "x": -203.0,
      "y": 65.0,
      "z": 140.0
    },
    "name": "Misc_TrafficCone",
    "parent_name": "VehicleMesh",
    "rotation": {
      "pitch": 0.0,
      "roll": 0.0,
      "yaw": 0.0
    },
    "scale": {
      "x": 1.0,
      "y": 1.0,
      "z": 1.0
    },
    "type": "StaticMeshComponent"
  },
  {
    "class_path": "/Game/Meshes/RoadArt/Organize/StreetSet/Misc_TrafficCone.Misc_TrafficCone",
    "location": {
      "x": 0.0,
      "y": 0.0,
      "z": 18.0
    },
    "name": "Misc_TrafficCone1",
    "parent_name": "Misc_TrafficCone",
    "rotation": {
      "pitch": 0.0,
      "roll": 0.0,
      "yaw": 0.0
    },
    "scale": {
      "x": 1.0,
      "y": 1.0,
      "z": 1.0
    },
    "type": "StaticMeshComponent"
  }
]
Materials as part of the Scenario
"tagged_components"
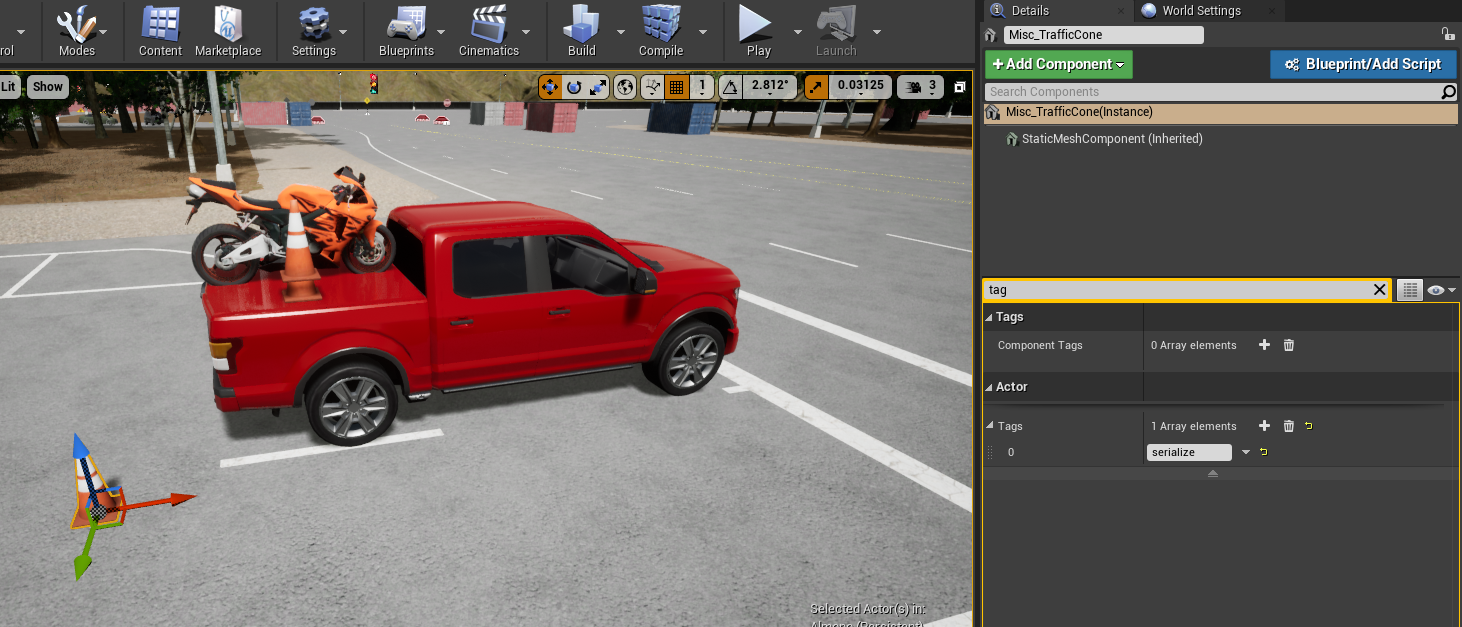
By default, materials are not serialized to the scenario file, however, they can be! Simply tag the component you wish to serialize the materials for. This will result in the materials saved out for that component and can be changed in the json to spawn different materials when the scenario is loaded. To do do this add the "serialize" tag to the actor component you want to record the materials for.

In the example below, the truck's skeletal mesh has been tagged and therefore all of the materials in the materials array are now modifiable in the scenario file.
"tagged_components": [
  {
    "component_name": "VehicleMesh",
    "materials": [
      {
        "path": "/Game/Vehicles/Materials/Details/CarInterior.CarInterior"
      },
      {
        "path": "/Game/Vehicles/Materials/Metals/Mirrors.Mirrors"
      },
      {
        "path": "/Game/Vehicles/Materials/Glass/Glass3_Dark2_Inst.Glass3_Dark2_Inst"
      },
      {
        "path": "/Game/Vehicles/Materials/Glass/Glass3_Dark2_Inst.Glass3_Dark2_Inst"
      },
      {
        "path": "/Game/Vehicles/Materials/Plastic/Plastic_Grey_Dark.Plastic_Grey_Dark"
      },
      {
        "path": "/Game/Vehicles/Materials/Plastic/Plastic_Grey_Dark.Plastic_Grey_Dark"
      },
      {
        "path": "/Game/Vehicles/Materials/Metals/Metal_Chrome_MAT_.Metal_Chrome_MAT_"
      },
      {
        "path": "/Game/Vehicles/Materials/Metals/Metal_DarkChrome_MAT.Metal_DarkChrome_MAT"
      },
      {
        "path": "/Game/Vehicles/CarPaint/Carpaint_Red.Carpaint_Red"
      },
      {
        "path": "/Game/Vehicles/Materials/Plastic/Plastic_Black_Matte.Plastic_Black_Matte"
      },
      {
        "path": "/Game/Vehicles/Materials/Glass/Vehicle_Lights_Brakes_MAT.Vehicle_Lights_Brakes_MAT"
      },
      {
        "path": "/Game/Vehicles/Materials/Tires/Tire_V2_MAT.Tire_V2_MAT"
      },
      {
        "path": "/Game/Vehicles/Materials/Glass/Window_MAT.Window_MAT"
      },
      {
        "path": "/Game/Vehicles/Materials/Plastic/Plastic_Black_Matte.Plastic_Black_Matte"
      },
      {
        "path": "/Game/Vehicles/Materials/Plastic/Plastic_White_Off.Plastic_White_Off"
      },
      {
        "path": "/Game/Vehicles/Materials/Glass/Glass3_Inst.Glass3_Inst"
      },
      {
        "path": "/Game/Vehicles/Materials/Metals/Metal_Chrome_MAT_.Metal_Chrome_MAT_"
      },
      {
        "path": "/Game/Vehicles/Materials/Glass/Vehicle_Lights_Reverse.Vehicle_Lights_Reverse"
      },
      {
        "path": "/Game/Vehicles/Materials/Glass/Glass_Red_MAT.Glass_Red_MAT"
      },
      {
        "path": "/Game/Vehicles/CarPaint/Carpaint_Red.Carpaint_Red"
      },
      {
        "path": "/Game/Vehicles/Materials/Metals/Metal_Chrome_MAT_.Metal_Chrome_MAT_"
      },
      {
        "path": "/Game/Vehicles/Materials/Plastic/Plastic_Grey_80_Matte.Plastic_Grey_80_Matte"
      },
      {
        "path": "/Game/Vehicles/Materials/Glass/Glass3_Dark1_Inst.Glass3_Dark1_Inst"
      },
      {
        "path": "/Game/Vehicles/Materials/Glass/Vehicle_Lights_Blinker_Left_MAT.Vehicle_Lights_Blinker_Left_MAT"
      },
      {
        "path": "/Game/Vehicles/Materials/Glass/Vehicle_Lights_Blinker_Right_MAT.Vehicle_Lights_Blinker_Right_MAT"
      },
      {
        "path": "/Game/Vehicles/Materials/Plastic/Undercarage.Undercarage"
      },
      {
        "path": "/Game/Vehicles/Materials/Glass/Vehicle_Lights_Brakes_2_MAT.Vehicle_Lights_Brakes_2_MAT"
      },
      {
        "path": "/Game/Vehicles/Materials/Glass/Vehicle_Lights_Plates.Vehicle_Lights_Plates"
      },
      {
        "path": "/Game/Vehicles/Materials/Glass/Vehicle_Lights_Brakes_2_MAT.Vehicle_Lights_Brakes_2_MAT"
      },
      {
        "path": "/Game/Vehicles/Materials/Glass/Vehicle_Lights_Blinker_Right_2_MAT.Vehicle_Lights_Blinker_Right_2_MAT"
      },
      {
        "path": "/Game/Vehicles/Materials/Glass/Vehicle_Lights_Blinker_Left_2_MAT.Vehicle_Lights_Blinker_Left_2_MAT"
      }
    ]
  }
]
NOTE: You must have a vehicle with the tag "ego," otherwise it cannot be used with the monoDrive client.
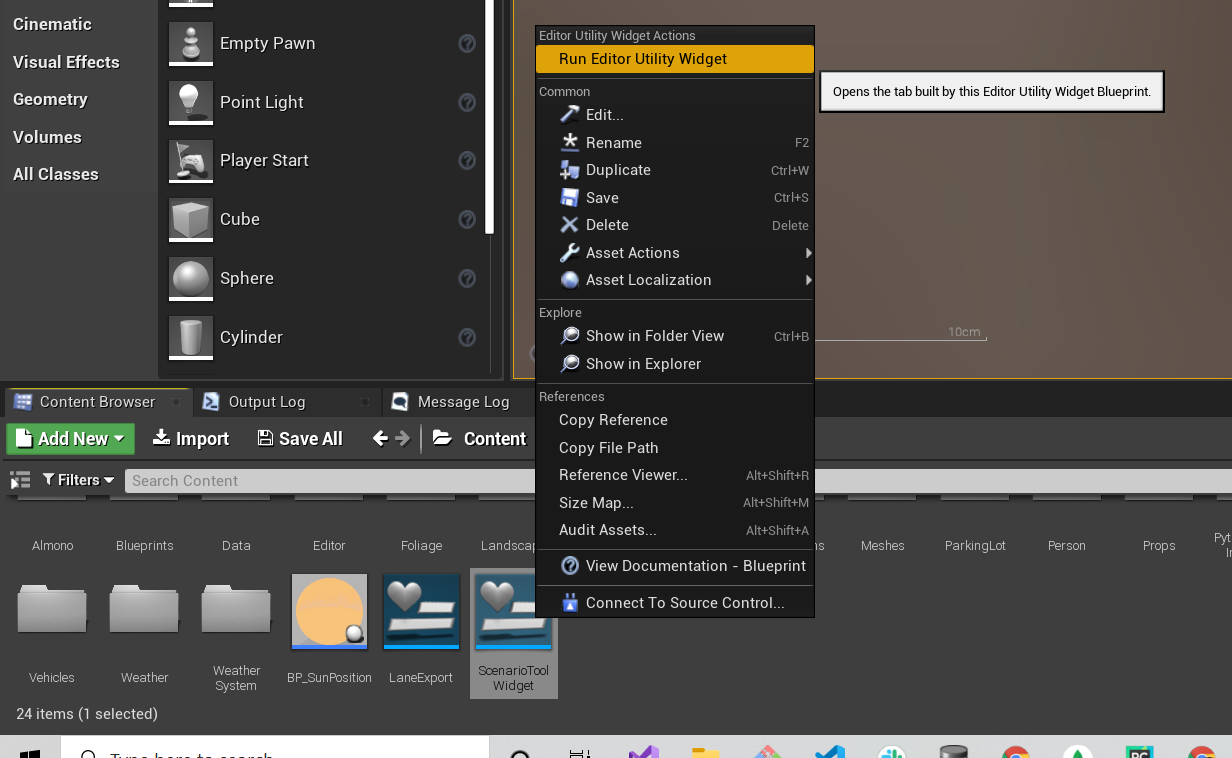
Scenario Setup/ Scenario File Tool Widget
By opening the Scenario File Tool Widget, users can save scenarios to monoDrive scenario files that can then be used in the Closed loop modes of the monoDrive Simulator and Scenario Editor. New Scenario files can be sent to the running simulator to replay dynamic actors for testing and review.
To begin, find the tool "Scenario File Tool Widget" under the Content Folder, right-click and select Run Editor Utility Widget.
In the "Scenario File Tool Widget", the user can load or save a new scenario file. Selecting "Save" will write the scene's current configuration to the specified file on FilePath. This will overwrite any file that has the same name.
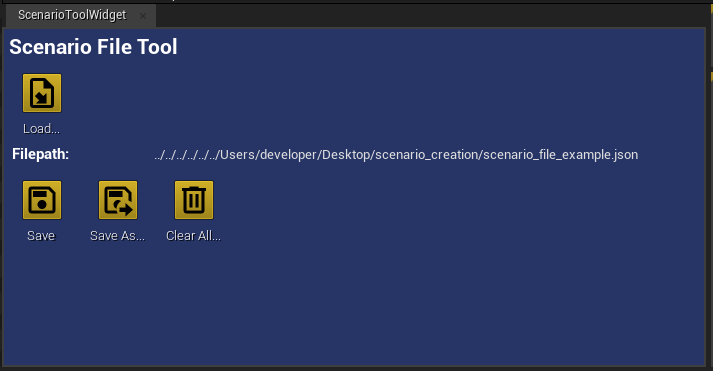
It is important to use "Clear All" for assets to be reset on the editor before using any client to playback the scenario. Failing to clear all assets may result in issues with playbacks.
Example json file generated for the truck with two nested cones, a motorcycle, and another random cone that is not attached to the truck.
Scenario File Reference
This example scenario configuration is the same scenario as used in examples in prior sections on this page. This generated json file contains these assets: a truck vehicle with two nested cones and a nested motorcycle and a cone that is not attached to the truck.
{
  "tagged_actors": [
    {
      "blueprint_parameters": [],
      "class_path": "/Game/Meshes/RoadArt/Organize/StreetSet/Misc_TrafficCone.Misc_TrafficCone",
      "instance_components": [],
      "location": {
        "x": 11713.0,
        "y": -835.0,
        "z": 12.0
      },
      "name": "Misc_TrafficCone_2",
      "rotation": {
        "pitch": 0.0,
        "roll": 0.0,
        "yaw": 0.0
      },
      "scale": {
        "x": 1.0,
        "y": 1.0,
        "z": 1.0
      },
      "tagged_components": [],
      "tags": [
        "serialize"
      ],
      "type": "StaticMeshActor"
    },
    {
      "blueprint_parameters": [
        {
          "max": true,
          "min": false,
          "name": "LightsOn",
          "type": "bool",
          "value": true
        }
      ],
      "class_path": "/Game/Blueprints/prp_streetLight_Blueprint.prp_streetLight_Blueprint_C",
      "instance_components": [],
      "location": {
        "x": 11804.0,
        "y": -2623.0,
        "z": 0.0
      },
      "name": "prp_streetLight146",
      "rotation": {
        "pitch": 0.0,
        "roll": 0.0,
        "yaw": -176.0474853515625
      },
      "scale": {
        "x": 1.0,
        "y": 1.0,
        "z": 1.0
      },
      "tagged_components": [],
      "tags": [
        "street_light",
        "static",
        "serialize"
      ],
      "type": "Actor"
    }
  ],
  "trigger_boxes": [],
  "vehicles": [
    {
      "behavior_settings": {
        "destroy_on_collision": false,
        "ignore_lane_change_boxes": false,
        "ignore_other_vehicles": false,
        "ignore_traffic_signals": false,
        "initial_speed_is_delta": true,
        "lane_change_safely": true,
        "limit_speed_in_curves": true,
        "obey_road_speed_limits": true,
        "overtake_timer_trigger": 3.5,
        "should_overtake_slower_vehicles": false,
        "snap_to_lane": true
      },
      "body_color": "Carpaint_Red",
      "class_path": "/Game/Vehicles/truck_monoDrive_01.truck_monoDrive_01_C",
      "controller_settings": {
        "auto_control_mode": true,
        "car_charts": false,
        "debug_drawing": false,
        "deceleration_constraints": {
          "x": -350.0,
          "y": -700.0
        },
        "distance_to_stop_sign": 300.0,
        "initial_speed": 0.0,
        "lane_change_comfort_proximity": 800.0,
        "lane_change_steer_clamp_curve": [
          [
            0.0,
            1.0
          ],
          [
            10.0,
            1.0
          ],
          [
            20.0,
            0.20000000298023224
          ],
          [
            30.0,
            0.05000000074505806
          ],
          [
            40.0,
            0.03999999910593033
          ],
          [
            55.0,
            0.029999999329447746
          ],
          [
            65.0,
            0.029999999329447746
          ],
          [
            75.0,
            0.029999999329447746
          ]
        ],
        "lane_change_transition_distance": 40.0,
        "lane_offset": 0.0,
        "rolling_stop_speed": 0.0010000000474974513,
        "search_forward_distance": 15000.0,
        "set_speed": 0.0,
        "spawn_offset": {
          "x": 0.0,
          "y": 0.0,
          "z": 0.0
        },
        "steer_forward_distance": {
          "x": 300.0,
          "y": 1800.0
        },
        "steer_forward_distance_lane_change": {
          "x": 800.0,
          "y": 2500.0
        },
        "steer_forward_speed": {
          "x": 0.0,
          "y": 60.0
        },
        "turn_preference": 3
      },
      "instance_components": [
        {
          "class_path": "/Game/Vehicles/Models/motorcycle_monoDrive_01/motorcycle_monoDrive_01_HD.motorcycle_monoDrive_01_HD",
          "location": {
            "x": -196.0,
            "y": 0.0,
            "z": 133.0
          },
          "name": "motorcycle_monoDrive_01_HD",
          "parent_name": "VehicleMesh",
          "rotation": {
            "pitch": 0.0,
            "roll": 0.0,
            "yaw": 0.0
          },
          "scale": {
            "x": 1.0,
            "y": 1.0,
            "z": 1.0
          },
          "type": "StaticMeshComponent"
        },
        {
          "class_path": "/Game/Meshes/RoadArt/Organize/StreetSet/Misc_TrafficCone.Misc_TrafficCone",
          "location": {
            "x": -203.0,
            "y": 65.0,
            "z": 140.0
          },
          "name": "Misc_TrafficCone",
          "parent_name": "VehicleMesh",
          "rotation": {
            "pitch": 0.0,
            "roll": 0.0,
            "yaw": 0.0
          },
          "scale": {
            "x": 1.0,
            "y": 1.0,
            "z": 1.0
          },
          "type": "StaticMeshComponent"
        },
        {
          "class_path": "/Game/Meshes/RoadArt/Organize/StreetSet/Misc_TrafficCone.Misc_TrafficCone",
          "location": {
            "x": 0.0,
            "y": 0.0,
            "z": 18.0
          },
          "name": "Misc_TrafficCone1",
          "parent_name": "Misc_TrafficCone",
          "rotation": {
            "pitch": 0.0,
            "roll": 0.0,
            "yaw": 0.0
          },
          "scale": {
            "x": 1.0,
            "y": 1.0,
            "z": 1.0
          },
          "type": "StaticMeshComponent"
        }
      ],
      "location": {
        "x": 12096.0,
        "y": -973.0,
        "z": 12.0
      },
      "name": "truck_monoDrive_01_2",
      "rotation": {
        "pitch": 0.0,
        "roll": 0.0,
        "yaw": 0.0
      },
      "scale": {
        "x": 1.0,
        "y": 1.0,
        "z": 1.0
      },
      "tagged_components": [
        {
          "component_name": "VehicleMesh",
          "materials": [
            {
              "path": "/Game/Vehicles/Materials/Details/CarInterior.CarInterior"
            },
            {
              "path": "/Game/Vehicles/Materials/Metals/Mirrors.Mirrors"
            },
            {
              "path": "/Game/Vehicles/Materials/Glass/Glass3_Dark2_Inst.Glass3_Dark2_Inst"
            },
            {
              "path": "/Game/Vehicles/Materials/Glass/Glass3_Dark2_Inst.Glass3_Dark2_Inst"
            },
            {
              "path": "/Game/Vehicles/Materials/Plastic/Plastic_Grey_Dark.Plastic_Grey_Dark"
            },
            {
              "path": "/Game/Vehicles/Materials/Plastic/Plastic_Grey_Dark.Plastic_Grey_Dark"
            },
            {
              "path": "/Game/Vehicles/Materials/Metals/Metal_Chrome_MAT_.Metal_Chrome_MAT_"
            },
            {
              "path": "/Game/Vehicles/Materials/Metals/Metal_DarkChrome_MAT.Metal_DarkChrome_MAT"
            },
            {
              "path": "/Game/Vehicles/CarPaint/Carpaint_Red.Carpaint_Red"
            },
            {
              "path": "/Game/Vehicles/Materials/Plastic/Plastic_Black_Matte.Plastic_Black_Matte"
            },
            {
              "path": "/Game/Vehicles/Materials/Glass/Vehicle_Lights_Brakes_MAT.Vehicle_Lights_Brakes_MAT"
            },
            {
              "path": "/Game/Vehicles/Materials/Tires/Tire_V2_MAT.Tire_V2_MAT"
            },
            {
              "path": "/Game/Vehicles/Materials/Glass/Window_MAT.Window_MAT"
            },
            {
              "path": "/Game/Vehicles/Materials/Plastic/Plastic_Black_Matte.Plastic_Black_Matte"
            },
            {
              "path": "/Game/Vehicles/Materials/Plastic/Plastic_White_Off.Plastic_White_Off"
            },
            {
              "path": "/Game/Vehicles/Materials/Glass/Glass3_Inst.Glass3_Inst"
            },
            {
              "path": "/Game/Vehicles/Materials/Metals/Metal_Chrome_MAT_.Metal_Chrome_MAT_"
            },
            {
              "path": "/Game/Vehicles/Materials/Glass/Vehicle_Lights_Reverse.Vehicle_Lights_Reverse"
            },
            {
              "path": "/Game/Vehicles/Materials/Glass/Glass_Red_MAT.Glass_Red_MAT"
            },
            {
              "path": "/Game/Vehicles/CarPaint/Carpaint_Red.Carpaint_Red"
            },
            {
              "path": "/Game/Vehicles/Materials/Metals/Metal_Chrome_MAT_.Metal_Chrome_MAT_"
            },
            {
              "path": "/Game/Vehicles/Materials/Plastic/Plastic_Grey_80_Matte.Plastic_Grey_80_Matte"
            },
            {
              "path": "/Game/Vehicles/Materials/Glass/Glass3_Dark1_Inst.Glass3_Dark1_Inst"
            },
            {
              "path": "/Game/Vehicles/Materials/Glass/Vehicle_Lights_Blinker_Left_MAT.Vehicle_Lights_Blinker_Left_MAT"
            },
            {
              "path": "/Game/Vehicles/Materials/Glass/Vehicle_Lights_Blinker_Right_MAT.Vehicle_Lights_Blinker_Right_MAT"
            },
            {
              "path": "/Game/Vehicles/Materials/Plastic/Undercarage.Undercarage"
            },
            {
              "path": "/Game/Vehicles/Materials/Glass/Vehicle_Lights_Brakes_2_MAT.Vehicle_Lights_Brakes_2_MAT"
            },
            {
              "path": "/Game/Vehicles/Materials/Glass/Vehicle_Lights_Plates.Vehicle_Lights_Plates"
            },
            {
              "path": "/Game/Vehicles/Materials/Glass/Vehicle_Lights_Brakes_2_MAT.Vehicle_Lights_Brakes_2_MAT"
            },
            {
              "path": "/Game/Vehicles/Materials/Glass/Vehicle_Lights_Blinker_Right_2_MAT.Vehicle_Lights_Blinker_Right_2_MAT"
            },
            {
              "path": "/Game/Vehicles/Materials/Glass/Vehicle_Lights_Blinker_Left_2_MAT.Vehicle_Lights_Blinker_Left_2_MAT"
            }
          ]
        }
      ],
      "tags": [
        "vehicle",
        "dynamic"
      ]
    }
  ]
}